Set Up Prerequisites
Minimum requirements
The minimum prerequisites to build OGS are:
- An 64-bit operating system (Linux, Windows 7 and up, macOS)
- Git (version control tool)
- CMake (build configuration tool, at least version 3.31)
- A compiler with C++23-support
- Python interpreter and libraries (and optionally the
uvvirtual environment management tool) - Optional (but recommended): Ninja build tool
Note about skipping installation steps
A fresh system with none of the prerequisites fulfilled is assumed. Skipping installation steps or using a non-supported version might result in unexpected problems. If possible, you may consider reinstalling or manual modifying the configuration of the already installed tool.
Step: Install a compiler
Alternative setup
Please note that the following setup on Windows is the native Windows development setup. This native setup is quite involved and heavy on system resources. We can recommend an alternative setup in which the Windows Subsystem for Linux is used: Setup and development of OGS follows the Linux way but you can use your Windows IDE (especially Visual Studio Code) for development and debugging. If this sounds interesting please follow the steps here!
Setup required system settings
Open the Windows Settings app and navigate to System / Advanced. Enable the long paths option:

And also enable the Developer Mode:

These two features enable the file system (and also the ogs-executable) to handle long file names / paths and allow for symbolic link creation and PowerShell script execution.
Install Visual Studio
As we use lots of features of the C++23-standard we support Visual Studio 2022 with compiler version 19.24 and up. It is perfectly fine to use the free Community Edition of Visual Studio.
- Download and install Visual Studio Community 2022.
- Select the workload
Desktop Development with C++. - See the following image for components which can be unchecked.
- Select the workload
- When installation finished please start Visual Studio once (when asked for credentials enter your Microsoft account or click on Skip for now).

On Debian-based (we recommend using Ubuntu 24.04) you need to install the build-essential-package (which contains the gcc-compiler and the make-tool):
sudo apt install build-essentialYou need to have at least GCC 13.3.0 which you can check with gcc --version.
Install the required compiler on older Ubuntu versions
If you are on an older Ubuntu version than 24.04 you can install a newer compiler from the ubuntu-toolchain-r/test-repository (with the following steps e.g. you can install GCC 13 on Ubuntu 20.04):
sudo apt-get install software-properties-common
sudo add-apt-repository ppa:ubuntu-toolchain-r/test
sudo apt-get update
sudo apt-get install gcc-13
sudo apt-get install g++-13To make the newly installed compiler the default one:
sudo update-alternatives --install /usr/bin/gcc gcc /usr/bin/gcc-13 60 \
--slave /usr/bin/g++ g++ /usr/bin/g++-13If you do not do this you have to specify the compiler during the first CMake run:
CC=gcc-13 CXX=c++-13 cmake ../ogs [more CMake options]xcode-select --installOpen Xcode one time to install some other Xcode stuff.
Now also install the Homebrew package manager:
/usr/bin/ruby -e "$(curl -fsSL https://raw.githubusercontent.com/Homebrew/install/master/install)"
brew doctorThe Homebrew package manager is needed for installing other libraries and packages. It is just like a Linux package manager.
Step: Install Git
Git is a powerful and distributed version control system. OGS source code is hosted on GitLab. See the developer guide page on Code Reviews for more info on how OGS uses GitLab for collaborative development.
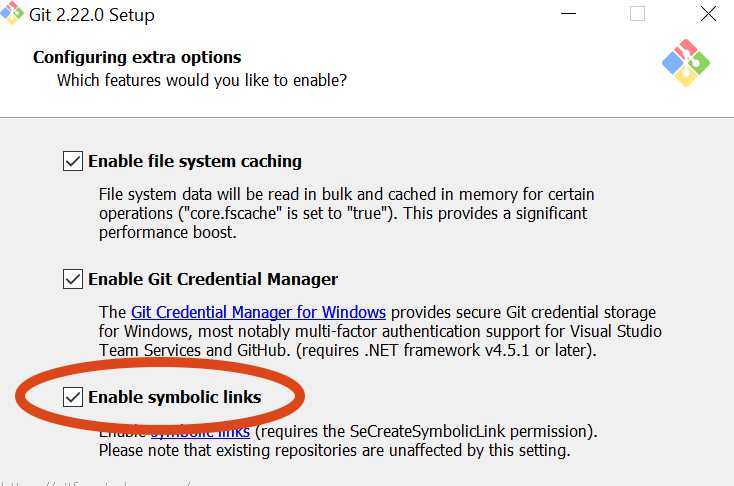
Download and install git from the git homepage. Use the default installer options but also enable Enable symbolic links under the Configuring extra options page.
This install a new command line called Git Bash which should be used for all git operations.
Let Git know who you are:
git config --global user.name "Your Name Here"
git config --global user.email "your_email@example.com"Enable the long paths feature:
git config --global core.longpaths trueYou may also have enable the long paths feature in the Windows registry.
In some corporate environments you may have to use a proxy server. In this case tell git about it:
git config --global http.proxy http://yourproxy.example.comPlease check if Git is already installed:
$ git --version
git version 2.xx.xOtherwise please install Git with your favorite package manager:
sudo apt-get install gitLet Git know who you are:
git config --global user.name "Your Name Here"
git config --global user.email "your_email@example.com"Optionally enable password storing when interacting with a remote server:
git config --global credential.helper storeIn some corporate environments you may have to use a proxy server. In this case tell git about it:
git config --global http.proxy http://yourproxy.example.comGit is already installed.
Let Git know who you are:
git config --global user.name "Your Name Here"
git config --global user.email "your_email@example.com"The graphical GitHub client is also maybe worth a look.
In some corporate environments you may have to use a proxy server. In this case tell git about it:
git config --global http.proxy http://yourproxy.example.comStep: Install CMake
- Download the installer, at the CMake download page choose the Windows (Win32 Installer).
- Execute the installer, please check the Add CMake to the system path for all users-option
Install CMake using system package manager. Please note that at least version 3.31 is required. On current tested Ubuntu version 24.04 you need to install CMake from Kitware’s APT repository with:
sudo apt-get install ca-certificates gpg wget
test -f /usr/share/doc/kitware-archive-keyring/copyright ||
wget -O - https://apt.kitware.com/keys/kitware-archive-latest.asc 2>/dev/null | gpg --dearmor - | sudo tee /usr/share/keyrings/kitware-archive-keyring.gpg >/dev/null
echo 'deb [signed-by=/usr/share/keyrings/kitware-archive-keyring.gpg] https://apt.kitware.com/ubuntu/ noble main' | sudo tee /etc/apt/sources.list.d/kitware.list >/dev/null
sudo apt-get update
sudo apt-get install cmakeFor other Linux distributions you want to use your distributions package manager, pip or snap.
Install CMake with Homebrew:
brew install cmakeOptional: Install Ninja
We recommend ninja as a cross-platform build tool (make-replacement).
Download the binary from GitHub and put the extracted ninja.exe in the PATH.
sudo apt-get install ninja-buildInstall Ninja with Homebrew:
brew install ninjaInstall Python 3
- Download the Python 3 installer
- Install with the following options
- Check Add Python 3.X to PATH
- Customize installation
- Make sure to have
pipenabled (you may uncheck Documentation, tcl/tk, Python test suite) - Check Add Python to environment variables!
Install Python 3 and pip:
sudo apt-get install python3 python3-pipInstall Python 3 with Homebrew:
brew install pythonRecommendation for Jupyter notebooks: OGS_USE_PIP=ON, uv
If you want to execute or develop Jupyter notebooks for more interactive benchmarks we recommend using the OGS_USE_PIP=ON CMake-option.
Thereby all Python prerequisites will be installed for you.
OGS_USE_PIP=ON requires uv,
a tool that handles Python dependencies and virtual environments.
I.e., please install uv if you want to set OGS_USE_PIP=ON.
See the Jupyter page for more info.
Optional: Install Qt, NetCDF and other dependencies for the Data Explorer
Use Another Qt installer (aqt) for installing the Qt binaries to some path on your machine:
pip install aqtinstall
mkdir qt
cd qt
aqt install-qt windows desktop 5.15.2 win64_msvc2019_64
aqt install-qt windows desktop 5.15.2 win64_msvc2019_64 --archives qtxmlpatternsThis will install Qt to [your-directory]/qt/5.15.2/msvc2019_64.
To finish add [your-directory]/qt/5.15.2/msvc2019_64/bin bin to the PATH environment variable.
Install NetCDF4 by downloading and installing the official installer. The C++-bindings to NetCDF are automatically build via CPM.
pip install aqtinstall
mkdir /opt/qt
cd /opt/qt
aqt install-qt linux desktop 5.15.2 gcc_64
aqt install-qt linux desktop 5.15.2 gcc_64 --archives qtxmlpatterns qtx11extrasMake sure to add /opt/qt/5.15.2/gcc_64/bin to the PATH.
Install more dependencies for VTK rendering and for NetCDF IO:
sudo apt-get install freeglut3 freeglut3-dev libglew-dev libglu1-mesa libglu1-mesa-dev \
libgl1-mesa-glx libgl1-mesa-dev libnetcdf-c++4-devpip install aqtinstall
mkdir /opt/qt
cd /opt/qt
aqt install-qt mac desktop 5.15.2 clang_64
aqt install-qt mac desktop 5.15.2 clang_64 --archives qtxmlpatterns qtx11extrasMake sure to add /opt/qt/5.15.2/clang_64/bin to the PATH.
Install NetCDF:
brew install netcdf-cxxThis article was written by Lars Bilke. If you are missing something or you find an error please let us know.
Generated with Hugo 0.150.1
in CI job 743172
|
Last revision: February 5, 2026
Commit: [py,cmake] Allow Python 3.14. 4d949dd99c
| Edit this page on