Creating Mesh with integrated Borehole Heat Exchangers
![]() This page is based on a Jupyter notebook.
This page is based on a Jupyter notebook.


This tutorial is made to illustrate the procedure of creating an OGS mesh file with Borehole Heat Exchangers (BHEs) in it.
Such mesh uses prism elements for the soil part, and line elements for the BHEs.
The produced mesh file is made explicitly for the HEAT_TRANSPORT_BHE module in OGS and will NOT work with other modules.
Please refer to the documentation of the HEAT_TRANSPORT_BHE process for more details of the project file configuration.
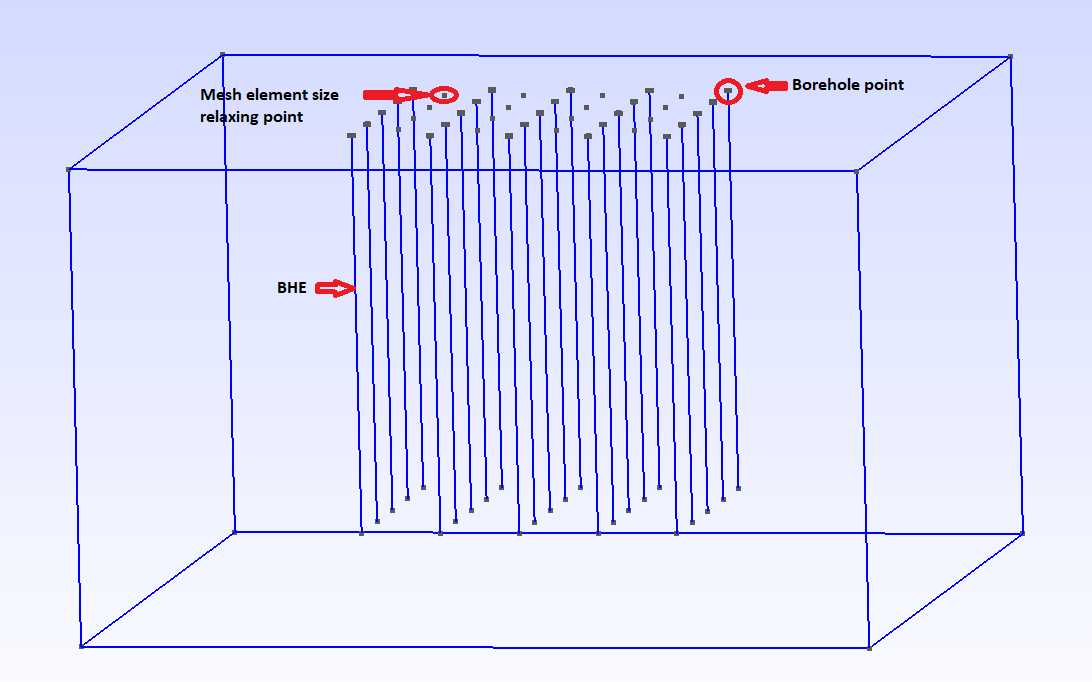
For a better understanding of the mesh needed for this process, the following snapshot illustrates a 3D model domain with several BHEs in it.
This tutorial contains two files,
- bhe_meshing.ipynb: This tutorial itself.
- bhe_coordinates.xlsx :The spreadsheet file containing parameters of the BHEs.
First, we import external packages, including Gmsh.
%reset -f…
(click to toggle)
%reset -f
import numpy as np
import pandas as pd
import gmsh
import sys
import osBefore using any functions in the Python API, Gmsh must be initialized.
gmsh.initialize()
gmsh.model.add("t1")The geometry is a 3D structure that has 25 boreholes in it. Each borehole is represented by a line element where each line is created by adding two end points. Each point requires an optional argument called ’tag’.
It is a strictly positive integer that uniquely identifies the point.
In this tutorial, we will use tags for all the borehole points so that we can identify any specific point.
The first step is to create the surface 1 with all the necessary points.
These points regulate the borehole locations, as well as the mesh size.
Now we define the basic geometry of the BHEs, as well as the element sizes around them.
For better optimal accuracy and better spatial discretizations, the mesh around the borehole point is designed according to relation (delta = alpha * bhe_radius) derived from Diersch et al. 2011 Part 2 (DOI: 10.1016/j.cageo.2010.08.002) where alpha = 6.134 for 6 surrounding nodes.
#environment variable for output path…
(click to toggle)
#environment variable for output path
from pathlib import Path

out_dir = Path(os.environ.get("OGS_TESTRUNNER_OUT_DIR", "_out"))
out_dir.mkdir(parents=True, exist_ok=True)

exe_dir = os.environ.get("OGS_BINARY_DIR")

# mesh file name
bhe_mesh_file_name = "bhe_mesh_file"

#geometry parameters
width = 200
length = 200
depth = 120
bhe_depth = depth - 20


#element sizes
bhe_radius = 0.07
alpha = 6.134                 # see Diersch et al. 2011 Part 2
delta = alpha * bhe_radius    # meshsize at BHE and distance of the surrounding optimal mesh points

elem_size_corner = 40
elem_size_BHE_relax = 2In the following step, we are going to create the geometry of the bottom surface using the python interface of Gmsh.
To create a point with the built-in CAD kernel, the Python API function gmsh.model.geo.addPoint() is used.
- the first 3 arguments are the point coordinates (x, y, z)
- the next (optional) argument is the target mesh size close to the point
- the last (optional) argument is the point tag (a strictly positive integer that uniquely identifies the point)
Here, we have assigned 4 boundary points.
gmsh.model.geo.addPoint(-width/2.0, 0.0, 0.0, elem_size_corner, 1)…
(click to toggle)
gmsh.model.geo.addPoint(-width/2.0, 0.0, 0.0, elem_size_corner, 1)
gmsh.model.geo.addPoint(width/2.0, 0.0, 0.0, elem_size_corner, 2)
gmsh.model.geo.addPoint(width/2.0, length, 0.0, elem_size_corner, 3)
gmsh.model.geo.addPoint(-width/2.0, length, 0.0, elem_size_corner, 4)4
Next, we need to create lines connecting the boundary points. The API to create straight-line segments with the built-in kernel follows the same conventions: the first 2 arguments are point tags (the start and end points of the line), and the last (optional) is the line tag. Note that curve tags are separate from point tags. Hence we can reuse tag ‘1’ for our first curve. And as a general rule, elementary entity tags in Gmsh have to be unique per geometrical dimension.
gmsh.model.geo.addLine(1, 2, 1)…
(click to toggle)
gmsh.model.geo.addLine(1, 2, 1)
gmsh.model.geo.addLine(2, 3, 2)
gmsh.model.geo.addLine(3, 4, 3)
gmsh.model.geo.addLine(4, 1, 4)4
Finally, we can create the surface 1. In order to define the surface using the four lines defined above, a curve loop must first be defined. An ordered list of connected curves defines a curve loop. The API function to create curve loops takes a list of integers as the first argument, and the curve loop tag (which must be unique amongst curve loops) as the second (optional) argument.
We can then define the surface as a list of curve loops.
Before the structure can be meshed, the CAD entities must be synchronized with the Gmsh model, which will create the relevant Gmsh data structures.
This is achieved by the API call gmsh.model.geo.synchronize(). Synchronizations can be called at any time.
gmsh.model.geo.addCurveLoop([1, 2, 3, 4], 1)…
(click to toggle)
gmsh.model.geo.addCurveLoop([1, 2, 3, 4], 1)

gmsh.model.geo.addPlaneSurface([-1], 1)
gmsh.model.geo.synchronize()Next step is to include 25 boreholes in this project, organized in a 5X5 array. The corresponding coordinates are imported from a Excel spreadsheet file.
df_bhe = pd.read_excel('bhe_coordinates.xlsx')
df_relax = pd.read_excel('bhe_coordinates.xlsx', sheet_name=1)Finally, all the borehole points and surrounding points are added to the surface 1. Here, 6 surrounding points for each borehole point are added with hexagonal shape like in this picture.
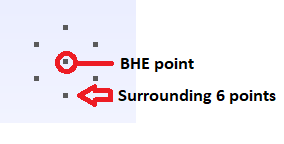
A detailed explanation and model verification can be found in Diersch et al. (2011). Here, the initial borehole point tag can not be smaller than 4 since there are already four boundary points.
x=df_bhe['X'] # X-coordinates…
(click to toggle)
x=df_bhe['X']   # X-coordinates
y=df_bhe['Y']   # Y-coordinates
z=df_bhe['Z']   # Z-coordinates
d=5             # initial borehole point tag

j=[]
for i in range(len(x)):
    X=x[i]
    Y=y[i]
    Z=z[i]

    gmsh.model.geo.addPoint(X, Y, Z, delta, d)                            # Diersch et al. 2011 Part 2

    gmsh.model.geo.addPoint(X, Y - delta, Z, delta, d+1)
    gmsh.model.geo.addPoint(X, Y + delta, Z, delta, d+2)

    gmsh.model.geo.addPoint(X+0.866*delta, Y + 0.5*delta, Z, delta, d+3)
    gmsh.model.geo.addPoint(X-0.866*delta, Y + 0.5*delta, Z, delta, d+4)

    gmsh.model.geo.addPoint(X+0.866*delta, Y - 0.5*delta, Z, delta, d+5)
    gmsh.model.geo.addPoint(X-0.866*delta, Y - 0.5*delta, Z, delta, d+6)

    j.append(d)
    gmsh.model.geo.synchronize()
    gmsh.model.mesh.embed(0,[d, d+1, d+2, d+3, d+4, d+5, d+6],2,1)

d = d+7In this step, all mesh element size relaxing points have been added and embedded in surface 1.
x=df_relax['X'] # X-coordinates…
(click to toggle)
x=df_relax['X']   # X-coordinates
y=df_relax['Y']   # Y-coordinates
z=df_relax['Z']   # Z-coordinates

for i in range(len(x)):
    X=x[i]
    Y=y[i]
    Z=z[i]

    gmsh.model.geo.addPoint(X, Y, Z, elem_size_BHE_relax, d)
    gmsh.model.geo.synchronize()
    gmsh.model.mesh.embed(0,[d],2,1)
d = d+1Now, the gmsh.model.geo.extrude command extrudes the surface 1 along the z axis and automatically creates a new volume (as well as all the needed points, curves and surfaces). The function takes a vector of (dim, tag) pairs as input as well as the translation vector, and returns a vector of (dim, tag) pairs as output.
The 2D mesh extrusion is done with the same extrude() function, but by specifying element Layers (Here, one layer each with 12 subdivisions with a total height of 120). The number of elements for each layer and the (end) height of each layer are specified in two vectors.
The last (optional) argument for the extrude() function specifies whether the extruded mesh should be recombined or not.
In this case, it is True since we want to recombine and produce prism mesh elements.
Later gmsh.model.addPhysicalGroup command used to group elementary geometrical entities into more meaningful groups, e.g. to define some mathematical (“domain”, “boundary”), functional (“left wing”, “fuselage”) or material (“steel”, “carbon”) properties. Gmsh will export in output files only mesh elements that belong to at least one physical group. Physical groups are also identified by tags, i.e. strictly positive integers, that should be unique per dimension (0D, 1D, 2D or 3D).
gmsh.model.geo.synchronize()…
(click to toggle)
gmsh.model.geo.synchronize()
R = gmsh.model.geo.extrude([(2, 1)], 0, 0, -depth, [12], [1], True)
gmsh.model.addPhysicalGroup(3, [R[1][1]], 1)Warning : Unknown entity of dimension 3 and tag 1 in physical group 1
1
In this step, all BHE points will be extruded up to bhe_depth and each BHE line will be assigned unique physical group.
k= 2…
(click to toggle)
k= 2
for u in j:
    G = gmsh.model.geo.extrude([(0, u)], 0, 0, -bhe_depth, [10], [1], True)
    gmsh.model.addPhysicalGroup(1, [G[1][1]], k)
    k = k + 1
gmsh.model.geo.synchronize()Warning : Unknown entity of dimension 1 and tag 27 in physical group 2
Warning : Unknown entity of dimension 1 and tag 28 in physical group 3
Warning : Unknown entity of dimension 1 and tag 29 in physical group 4
Warning : Unknown entity of dimension 1 and tag 30 in physical group 5
Warning : Unknown entity of dimension 1 and tag 31 in physical group 6
Warning : Unknown entity of dimension 1 and tag 32 in physical group 7
Warning : Unknown entity of dimension 1 and tag 33 in physical group 8
Warning : Unknown entity of dimension 1 and tag 34 in physical group 9
Warning : Unknown entity of dimension 1 and tag 35 in physical group 10
Warning : Unknown entity of dimension 1 and tag 36 in physical group 11
Warning : Unknown entity of dimension 1 and tag 37 in physical group 12
Warning : Unknown entity of dimension 1 and tag 38 in physical group 13
Warning : Unknown entity of dimension 1 and tag 39 in physical group 14
Warning : Unknown entity of dimension 1 and tag 40 in physical group 15
Warning : Unknown entity of dimension 1 and tag 41 in physical group 16
Warning : Unknown entity of dimension 1 and tag 42 in physical group 17
Warning : Unknown entity of dimension 1 and tag 43 in physical group 18
Warning : Unknown entity of dimension 1 and tag 44 in physical group 19
Warning : Unknown entity of dimension 1 and tag 45 in physical group 20
Warning : Unknown entity of dimension 1 and tag 46 in physical group 21
Warning : Unknown entity of dimension 1 and tag 47 in physical group 22
Warning : Unknown entity of dimension 1 and tag 48 in physical group 23
Warning : Unknown entity of dimension 1 and tag 49 in physical group 24
Warning : Unknown entity of dimension 1 and tag 50 in physical group 25
Warning : Unknown entity of dimension 1 and tag 51 in physical group 26
Meshes generated with Gmsh must be converted to VTU file format later. Currently, the only supported Gmsh format is 2.2
gmsh.option.setNumber("Mesh.MshFileVersion", 2.2)We can then generate a 3D mesh and save it to disk
gmsh.model.mesh.generate(3)…
(click to toggle)
gmsh.model.mesh.generate(3)

gmsh.model.mesh.removeDuplicateNodes()

gmsh.write(f"{out_dir}/{bhe_mesh_file_name}.msh")Info : Meshing 1D...
Info : [ 0%] Meshing curve 1 (Line)
Info : [ 10%] Meshing curve 2 (Line)
Info : [ 10%] Meshing curve 3 (Line)
Info : [ 10%] Meshing curve 4 (Line)
Info : [ 20%] Meshing curve 6 (Extruded)
Info : [ 20%] Meshing curve 7 (Extruded)
Info : [ 20%] Meshing curve 8 (Extruded)
Info : [ 20%] Meshing curve 9 (Extruded)
Info : [ 30%] Meshing curve 11 (Extruded)
Info : [ 30%] Meshing curve 12 (Extruded)
Info : [ 30%] Meshing curve 16 (Extruded)
Info : [ 30%] Meshing curve 20 (Extruded)
Info : [ 40%] Meshing curve 27 (Extruded)
Info : [ 40%] Meshing curve 28 (Extruded)
Info : [ 40%] Meshing curve 29 (Extruded)
Info : [ 50%] Meshing curve 30 (Extruded)
Info : [ 50%] Meshing curve 31 (Extruded)
Info : [ 50%] Meshing curve 32 (Extruded)
Info : [ 50%] Meshing curve 33 (Extruded)
Info : [ 60%] Meshing curve 34 (Extruded)
Info : [ 60%] Meshing curve 35 (Extruded)
Info : [ 60%] Meshing curve 36 (Extruded)
Info : [ 60%] Meshing curve 37 (Extruded)
Info : [ 70%] Meshing curve 38 (Extruded)
Info : [ 70%] Meshing curve 39 (Extruded)
Info : [ 70%] Meshing curve 40 (Extruded)
Info : [ 80%] Meshing curve 41 (Extruded)
Info : [ 80%] Meshing curve 42 (Extruded)
Info : [ 80%] Meshing curve 43 (Extruded)
Info : [ 80%] Meshing curve 44 (Extruded)
Info : [ 90%] Meshing curve 45 (Extruded)
Info : [ 90%] Meshing curve 46 (Extruded)
Info : [ 90%] Meshing curve 47 (Extruded)
Info : [ 90%] Meshing curve 48 (Extruded)
Info : [100%] Meshing curve 49 (Extruded)
Info : [100%] Meshing curve 50 (Extruded)
Info : [100%] Meshing curve 51 (Extruded)
Info : Done meshing 1D (Wall 0.000312572s, CPU 0s)
Info : Meshing 2D...
Info : [ 0%] Meshing surface 1 (Plane, Frontal-Delaunay)
Info    : [ 20%] Meshing surface 13 (Extruded)
Info    : [ 40%] Meshing surface 17 (Extruded)
Info    : [ 60%] Meshing surface 21 (Extruded)
Info    : [ 70%] Meshing surface 25 (Extruded)
Info    : [ 90%] Meshing surface 26 (Extruded)
Info    : Done meshing 2D (Wall 0.25586s, CPU 0.211624s)
Info    : Meshing 3D...
Info    : Meshing volume 1 (Extruded)
Info    : Done meshing 3D (Wall 1.35291s, CPU 1.307s)
Info    : Optimizing mesh...
Info    : Done optimizing mesh (Wall 0.00437524s, CPU 0.004354s)
Info    : 120136 nodes 258710 elements
Info    : Removing duplicate mesh nodes...
Info    : Found 250 duplicate nodes
Info    : Removed 250 duplicate mesh nodes
Info    : Done removing duplicate mesh nodes
Info    : Writing '/var/lib/gitlab-runner/builds/t1_R7hwLX/1/ogs/build/release-all/web/content/docs/tutorials/bhe_meshing/notebook-bhe_meshing/bhe_mesh_file.msh'...
Info : Done writing '/var/lib/gitlab-runner/builds/t1_R7hwLX/1/ogs/build/release-all/web/content/docs/tutorials/bhe_meshing/notebook-bhe_meshing/bhe_mesh_file.msh'
Launch the GUI to see the results. Later gmsh.finalize() will be called when done using Gmsh Python API
if "OGS_TESTRUNNER" not in os.environ:…
(click to toggle)
if "OGS_TESTRUNNER" not in os.environ:
   gmsh.fltk.run()

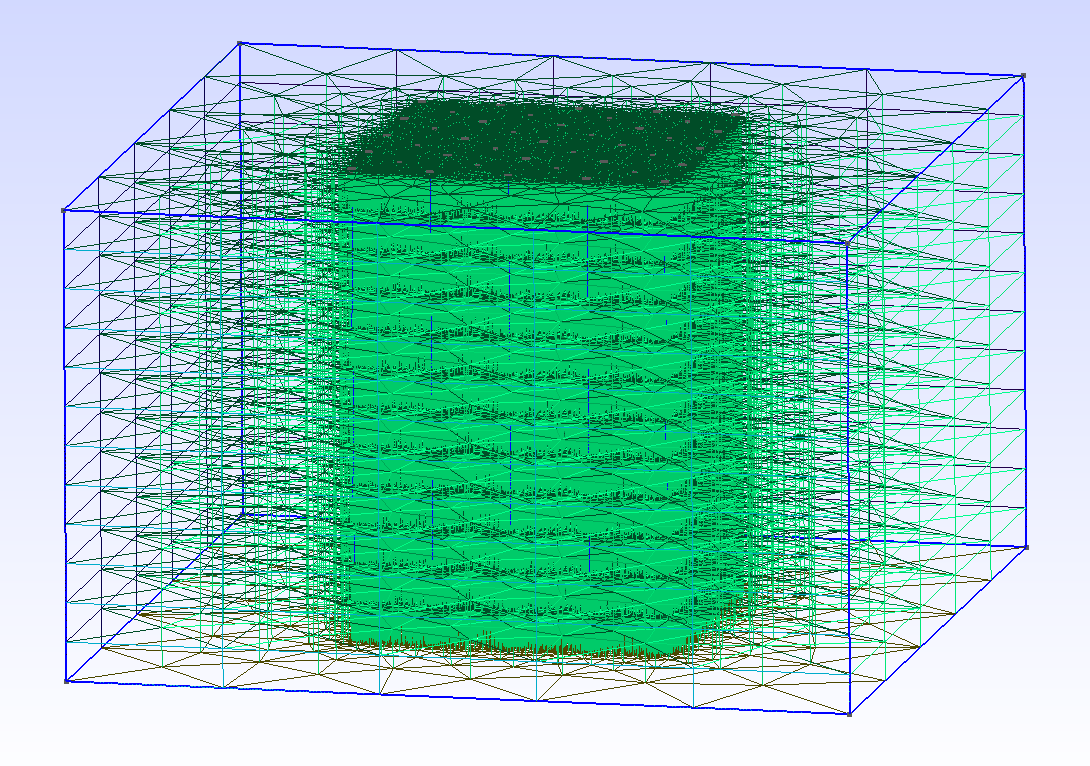
gmsh.finalize()If everything runs well, you will see the following mesh.
Now checking whether the Gmsh format mesh file is properly created. If not give an error message.
check_file = os.path.isfile(f"{out_dir}/{bhe_mesh_file_name}.msh")…
(click to toggle)
check_file = os.path.isfile(f"{out_dir}/{bhe_mesh_file_name}.msh")
if check_file:
    print("Creation of BHE mesh in Gmsh format was successful.")
else:
    msg = "Error! Gmsh file is not properly created in the BHE meshing tutorial."
raise Exception(msg)Creation of BHE mesh in Gmsh format was successful.
In this step, we will investigate the number of nodes, lines, prisms, and Material ID of the created mesh file, to validate if it is created properly for simulation.
gmsh.initialize()…
(click to toggle)
gmsh.initialize()
gmsh.open(f"{out_dir}/{bhe_mesh_file_name}.msh")
nodeTags, coord, parametricCoord = gmsh.model.mesh.getNodes(-1,-1)
elemTypes, line_elemTags, elemNodeTags =gmsh.model.mesh.getElements(1,-1)
elemTypes, volume_elemTags, elemNodeTags =gmsh.model.mesh.getElements(3,-1)
dimTags = gmsh.model.getPhysicalGroups(1)
Material_ID = len(dimTags)
gmsh.finalize()

print("Total Nodes", np.size(nodeTags))
print("Nr of lines", np.size(line_elemTags))
print("Nr. of prisms", np.size(volume_elemTags))
print("Material ID", Material_ID)

#if not ((np.size(nodeTags) == 119886) and (np.size(line_elemTags) == 250) and (np.size(volume_elemTags)==221064) and (Material_ID == 25)):
# raise Exception("Error! The number of nodes, elements and Material_IDs in the generated Gmsh file is not correct.")Info : Reading '/var/lib/gitlab-runner/builds/t1_R7hwLX/1/ogs/build/release-all/web/content/docs/tutorials/bhe_meshing/notebook-bhe_meshing/bhe_mesh_file.msh'...
Info : 119886 nodes
Info : [ 0%] Reading nodes
Info : [ 10%] Reading nodes
Info : [ 20%] Reading nodes
Info : [ 30%] Reading nodes
Info : [ 40%] Reading nodes
Info : [ 50%] Reading nodes
Info : [ 60%] Reading nodes
Info : [ 70%] Reading nodes
Info : [ 80%] Reading nodes
Info : [ 90%] Reading nodes
Info : 221314 elements
Info : [ 0%] Reading elements
Info : [ 10%] Reading elements
Info : [ 20%] Reading elements
Info : [ 30%] Reading elements
Info : [ 40%] Reading elements
Info    : [ 50%] Reading elements
Info    : [ 60%] Reading elements
Info    : [ 70%] Reading elements
Info    : [ 80%] Reading elements
Info    : [ 90%] Reading elements

Info    : Done reading '/var/lib/gitlab-runner/builds/t1_R7hwLX/1/ogs/build/release-all/web/content/docs/tutorials/bhe_meshing/notebook-bhe_meshing/bhe_mesh_file.msh'
Total Nodes 119886
Nr of lines 250
Nr. of prisms 221064
Material ID 25
Finally, the mesh file which has been created using the Python interface of Gmsh, will be converted to OGS mesh, in particular to VTU file format.
Please, add the executable GMSH2OGS to the directory of this example file, or add the path to the OGS binary folder into the running environment.
Here, option -v (--validation) validates the mesh and shows crucial information about the mesh.
Option -i takes Gmsh input file name as a string and -o is the output file name as a string as well
!GMSH2OGS -i {out_dir}/{bhe_mesh_file_name}.msh -o {out_dir}/{bhe_mesh_file_name}.vtu -v[32minfo:[m Reading /var/lib/gitlab-runner/builds/t1_R7hwLX/1/ogs/build/release-all/web/content/docs/tutorials/bhe_meshing/notebook-bhe_meshing/bhe_mesh_file.msh.
[33m[1mwarning:[m If the mesh is generated with Gmsh version 2 and it is saved (or exported) as "Version 2 ASCII" format, the flag --gmsh2_physical_id must be used for a correct conversion from physical id to MaterialIDs.
[32minfo:[m ... finished.
[32minfo:[m Nr. Nodes: 119886.
[32minfo:[m Nr. Elements: 221314.
[32minfo:[m Mem for mesh: 63 MiB
[32minfo:[m Time for reading: 1.452574 seconds.
[32minfo:[m Read 119886 nodes and 221314 elements.
[32minfo:[m Please check your mesh carefully!
[32minfo:[m Degenerated or redundant mesh elements can cause OGS to stop or misbehave.
[32minfo:[m Use the -e option to delete redundant line elements.
[32minfo:[m Axis aligned bounding box: x [-100, 100) (extent 200)
y [0, 200) (extent 200)
z [-120, 4.94066e-324) (extent 120)
[32minfo:[m Edge length: [0.284716, 43.3385]
[32minfo:[m Number of elements in the mesh:
[32minfo:[m Lines: 250
[32minfo:[m Prisms: 221064
[32minfo:[m There are 1 properties in the mesh:
[32minfo:[m MaterialIDs: (221314 values) [0, 25]
[32minfo:[m Mesh Quality Control:
[32minfo:[m Looking for unused nodes...
[32minfo:[m Found 0 potentially collapsible nodes.
[32minfo:[m Testing mesh element geometry:
[32minfo:[m No errors found.
[32minfo:[m No elements found with zero volume.
[32minfo:[m No elements found with non coplanar nodes.
[32minfo:[m No elements found with non-convex geometry.
[32minfo:[m No elements found with wrong node order.
[32minfo:[m 1 property vectors copied, 0 vectors skipped.
[32minfo:[m No holes found within the mesh.
[32minfo:[m Remark: Nodes n0 and n1 are considered to be 'collapsible' if the dist(n0, n1) is less than minimal edge length of elements in the mesh times 1e-6
The above conversion tool also shows that there exist 250 lines and 221064 prism elements. An assertion check is added here to make sure that the VTU format mesh file is properly created.
check_file = os.path.isfile(f"{out_dir}/{bhe_mesh_file_name}.vtu")…
(click to toggle)
check_file = os.path.isfile(f"{out_dir}/{bhe_mesh_file_name}.vtu")
if check_file:
    print("Conversion of mesh file from Gmsh to VTU format was successful.")
else:
    msg = "Error! Gmsh file is not properly converted to VTU format in the BHE meshing tutorial."
raise Exception(msg)Conversion of mesh file from Gmsh to VTU format was successful.
This article was written by Joy Brato Shil, Haibing Shao. If you are missing something or you find an error please let us know.
Generated with Hugo 0.150.1
in CI job 743172
|
Last revision: October 3, 2023